Saturday, July 30, 2011

Thrifty Pedestal Bowl


I never go to the thrift shop, but earlier this year I decided to make a trip anyway. I drove to the city and visited a thrift shop. I called up my friend of ~32 years and we had lunch that day so I knocked out two things at once. She thought I was crazy for my finds that day, but I swear for about $20 I got enough stuff to keep my busy for quite some time. I got canvases, frames, votives, magazine holder, candlesticks, etc. I could go on, but I will spare you the rest!
Never mind the light bulb! I was thinking I would do something else with it at first. Add sand paper, E6000, a plate, bowl, or cheese dome with block, and clear acrylic sealer for this craft.

I found this amazingly heavy candlestick though, and I decided to give it a makeover. I removed the metal candle holder from the top. Next, I started with a light sand. Off with the old, in with the new. Then I painted over it a dark brown to get rid of that blue! Once that dried I used a creme colored acrylic paint to paint over the brown.


Next, I gave the edges a light roughing up. Cleaned up the loose grit, and sprayed it with acrylic sealer x 2.


I also used Epoxy 6000 to glue the candle holder cup to the back of a beautiful bowl that was gifted to me from someone dearest to me with change she had...it was on clearance and I had left my purse behind. Clearly a mistake...you think?


Well, once everything had taken its course and dried nicely, I placed the candle holder into the candle stick and jumped over it three times. No really I just marveled at the possibilities that this little bowl will hold. I just know I am going to enjoy it. It cost me about $0.50 to make and my daughter... $2.75 :)- . 

Friday, July 29, 2011

Paint a Big Smiling Fish on Canvas

My nephew graduated from high school recently. He moved in to his own place this summer and is trying to get a start on his life. I found out that he got a tattoo of Florida and a lot of trouble from mom and his nana for that one.  I heard his walls were bare, so I decided to make him a painting tailored to him that his friends will ooh and ahh over... hopefully--fingers crossed.

I started with a blank canvas and using a pencil free hand sketched the outline of a fish. The silly fish pictures are popular in Florida right now. You see them at the restaurants and other businesses. The thing that is so funny to me is that I made a picture almost like the one that I am showing you today when I was in high school myself. It was made out of colored markers and was only done in dots--no lines. My picture sat in the front showcase of the same school he just graduated from, but many many moons later as the indians would say.  Now, I am basically doing the same fish, but as a painting.

I chose to put a dumbbell in its' fin because my nephew is most likely equivalent to a Master of Fitness in the Army. He works out a lot. I also chose to add his graduation year and school initials. I used yellow, black, and white outlined in hunter green for the scales. Those were his school colors. He wears ball caps backwards on his forehead now mostly. If I had added that to the top of the fish head, then it might look odd, so I chose a different route. He use to wear visors, so I added a visor with his favorite college using the main color of FSU in the fins. I also added a fish hook and wished after placing it on the hat, that I had glued a real one on instead. My nephew fishes a lot and has spent some time working on boats. I might go back and do that before I hand it over. My nephew has light tan freckles, so I added some to the snout area. Pretty lips and beautiful teeth are a must with a little smile line. Also, the sunglasses...Costas tortoise shell is what I painted on here. Oh and the famous tattoo of Florida on his side and breast... I couldn't forget that.

Just make a light penciled mark over the canvas where you want to fill it all in. You can always erase on canvas or after drying, paint over a mistake. It's great. Pick up some acrylics and you can do the same thing at home. Make a picture that is tailored to yourself or the person you are making it for. Add some character to it and have fun. With acrylic paints you can get very inexpensive in your local store, you can always start over.


I started filling in the background first. Then one by one I filled in the different areas. Always do the background areas first such as the scales then the fins... I found it easier to clean up my errors that way.


See the mess on his rear and top fins? I painted over it and you don't even see it in the final project.


Always make sure to keep your paint lids shut, palettes covered, and spare paint in the bottle for mess ups. Take your time and tackle one thing each day let it dry then start on another part.  You will be amazed at what you can do!


I originally had 25 for pounds on the dumbbell. I didn't want it to be a sissified number, so I thought 25 was okay, but then I got the idea to use his graduation year. Yes, 2011 is a much heavier dumbbell after all! I went back to the area where the number was, and I covered it in black. Once it dried, I added the year he graduated and his school's initials on the other end peeking out. You can see them in the final picture.

I also went back over the background with a big dry brush dabbing it lightly in white and added swirls in the water. I actually outlined the scales with a hunter or dark green T-shirt paint. It stands out from the canvas, and it is his school's color, so it was perfect. Much easier than using a brush.  Get creative!


I have to say he's pretty cool, my fish and all. What did you think I was talking about my nephew? :) Yes he is too. 

Next stop is a frame made from old wood. Hey grampy are you busy???

Tuesday, July 5, 2011

Picture Frame Dry Erase Board

Materials: Picture Frame, Masking Tape or Hot Glue, Scissors, Glass Cleaner, and Fabric (the size of the glass on the picture frame).


This is so easy, I really did not take photos during the process. I cleaned my glass with ammonia or glass cleaner. Once that was done, I took my pressed fabric and layed the print side facing down. Then I took the cardboard backside of the frame and placed it on the fabric. I cut the fabric around the cardboard backside leaving a small area that I could fold over on the back and either tape down or glue down. With the frame facing down, I layed the fabric with the print facing down on the glass and attached the cardboard back. I used hot glue, but I think masking tape would have been better to press the edges down on the backside.

Ta da your dry erase board it finished and it took less than 10 minutes total! This is a great idea for teens as well. My daughter is already begging to write me a note on it. Hmmm I might need to make her one for her room! 

DIY Plastic Decorative Frame Repair

Whoa I got my feet in this one! Sorry about that. Lol.

Materials to fix a broken plastic frame would be some good all purpose craft glue or gorilla glue, paint, clear glaze, and some hot glue.

I started with painting the edges of the broken pieces with the same color paint as the frame. This way when it is glued back together, you will most likely not see the where it has been broken. Once this dried, I sprayed the broken edges on all four pieces with clear glaze to put a nice gloss on it and darken the color shown above in black.

I put my all purpose craft glue on the cardboard frame shown above.

Once I spread a plentiful amount, I put a dab of hot glue in a few spots just to help me hold it in place to close the cracks. Once this harden, I allowed the frame to sit overnight to dry.

I am holding the side of the frame before I give it to its owner, but you can't even see where it had broken off on either the left or right side. 

So don't throw out those old decorative frames when they break! There is nothing a little glue could not fix!

Quick DIY Home Decor - Embroidery Hoop Fabric Wall Art

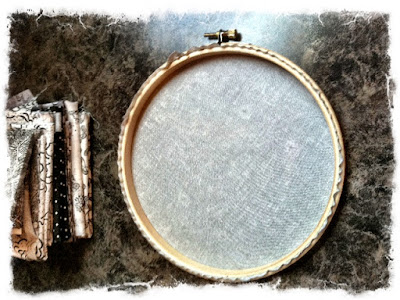
Today I was in a rush to decorate the wall in my sewing and art room. I have relatives coming this week. I did not want my walls here to look bare so I made some quick and cute wall art with embroidery hoops. Embroidery hoops at the craft supply stores run from $1 - $1.40 depending on the sizes. I grabbed the last two large hoops, four medium, and two small hoops. I also noticed some gray, white, and black prints for sale for $1.00 each 18 x 24" rectangle. So I picked the ones that ran in that color line. The only other thing for this craft is a pair of scissors.


Lay the fabric over the smaller ring in a set (the one without the screw in the top). Now close the larger hoop over the top of the smaller hoop so the fabric is tightly covering the space in the middle of the circle.


Start with pressing the fabric. Make sure the fabric will cover the hoop. Also check to make sure the hoop screws located at the top of the circle are all facing the same way or just flip that outside hoop over so they all face the same direction before you start.


Turn the hoop over to view the backside and trim off the extra fabric from the edge.

Now you are ready to hang your hoop on the wall. They would be super cute if you had a word like "DREAM" or "CREATE" on one of the larger hoops. You could even put your initials on one with either fabric paint or embroidered by your own personal machine or by a local embroidery store. Later when I have more time, I plan to add a bird or something cute to one of them and add some word art to another one or two...

(Nevermind that old electric panel box on the right!)

Sunday, July 3, 2011

Mod Paper Accordion Flowers or Circles as Wall Hangings, Ornaments, or Embellishments


These little accordions are easy, inexpensive, and quick to make.  You can use these accordions as wall hangings by themselves, on a canvas, on frames, or as ornaments for Christmas!

Materials included: Scrapbook paper, scissors, ruler, glue, hot glue with hot glue gun, buttons, felt (optional), and string or jute (optional).


The first thing I did was to measure the scrapbook paper. My paper was a large irregular size of 12x12.

I divided the sheet into four sections of 3" wide and cut out four strips.

Fold the end over approximately 1/2" and then repeat to form an accordion. 

After you have folded three of the sections into an accordion, glue the ends together to make one long strip.

Now glue the ends together to form a circle.

With the fourth strip, you can cut it in half and start the process over using two strips to glue together and form a circle.


 Now you take a piece of felt or paper and cut a smaller circle that you will hot glue to the backside of the accordion. Push from the outside of the circle inward to make sure the center of the accordion is tightly together after the hot glue sets.
On the back of this one, I used a piece of scrap paper instead of felt. :)

I attached a jute string to the backside so I can hang this on my wall.

On the front side I placed a button because that was all I had on hand at the moment I glued the first accordion together and had to cover a boo boo on the front. I imagine that you can use painted bottle top lids, rolled yarn or string, cut outs from cards or anything your little heart desires or has on hand.


I have them placed on this canvas so you can see just how cute they would be with a printed monogram cut out of photo paper.

Garland

Wall Hanging

They can be used for table settings with a wire attached to the backside. You can also add wire to the backside to make flowers for a vase or a wall hanging. They can be ornaments for any time of year. You can make them into a garland just like you would a paper bunting. You can add a photo to the front with some trim and it is a super cute frame for a grandmother or mom! Another great idea with them is that you can add them to the side of a frame.

These scrappy doohickey circles or flowers have endless possibilities!

Saturday, July 2, 2011

Monogrammed Canvas Wall Art


I found this cute idea at the MommaGoRound blog located at: http://www.mommagoround.com/2011/03/initial-wall-art-with-boerman-ramblings.html and thought I would make it and share it with you.

TIP: One thing I find with people using Mod Podge or Collage Pauge, is that they use too much. If you paint on a thin layer to your paper's backside then your paper will most likely not bubble up as much if at all. The same with the top layer. You can always come back after it dries initially to add the top layer and a second layer for more of a finish. 


Materials I used were Collage Pauge or Mod Podge, a pocket dictionary, scissors, exacto knife, paint sponge or brush, ruler, decorative shears (optional), a printed font on paper or photo paper, and a cheap canvas. I found my canvas at the thrift shop for $1.00. It is a Camp Rock from Disney canvas. It has a really nice hanger on the back of it, and the canvas will be covered by the end of the project. 

 
I started by cutting out pages from the dictionary. I used the pocket dictionary that costs about $1 before school starts you see them in the stores. The one I used was old and yellowed a bit. I painted Collage Pauge onto the canvas and the backside of the paper. Next I placed the paper on the canvas where I coated it with the Collage Pauge. Once I covered all areas with dictionary pages to include the sides, I covered the paper with a thin coat of Collage Pauge and let it dry.


Instead of using beans on the canvas at the end of the project onto my monogram like MommaGoRound, I decided to use a printed monogram on photo paper with the year anniversary year.

In Word, I inserted a shape choosing oval. I chose to format the oval with small squares instead of a solid line. I inserted a text box and used the font "Californian" for the letter "H" sized 600. You can type the size in the pull down in Word since it doesn't go past 72. I inserted another text box under the middle of the "H" and used the font "Edwardian" for the name "Herring" in gray and bold. The last text box I stretched up the side of the "H" and  typed "Est. 1994" in black in "Edwardian".  Both of these were also in a smaller font. When you insert a text box in Word 2007, there is a small place on the upper left hand corner of your monitor that says "text direction". Click on that to make text print sideways on your paper.


I printed my monogram on pro photo paper glossy and cut out the monogram using scissors with a decorative shear. Then I used Collage Pauge onto the backside and the covered canvas where I was going to attach the monogram to the frame.  


I made sure to measure the top, bottom, and both sides. I made sure my monogram was lined up, centered, level, and right side up. It's important to know where the hanger is on the canvas before you put your monogram on the canvas!


Now once all the pasting was complete I let it dry overnight. In the morning I added a thin layer to the top of the entire project and let it dry.


I think it turned out so cute-- I love it! This project only cost me $1 because I had all the supplies on hand except for the recycled canvas.

Happy Crafting!


Friday, July 1, 2011

T-shirt Makeover or Redo

For this t-shirt makeover, I took a $5 t-shirt I purchased on sale and with some scissors began cutting up the shirt. 

 I cut out the neckline, cut up the sides, cut off the sleeves, and cut up the shoulder hem to the neckline.


I cut into the back side of the shirt taking out a larger section from the arm/shoulder area to the mid back. This made it easier to twist the top section in an upcoming step. I also trimmed up the front arm area and the neckline. I wanted the shirt to have a little bit of a lower neckline than shown below so I trimmed and trimmed again... 


 I pinned the right sides together and then headed to the sewing machine.


On the backside of the shirt, I twisted the fabric one full twist and matched up the shoulders to one another. I sewed up the sides of the shirt and the top of the shoulders with the twist in place.


I got the top the way I wanted it and here it is... It will be worn with a tank underneath.