My family has been building a pavilion after my husband's work day is complete out back for family gatherings and barbecues this past week or two...

We started with a truck load of clay to bring the ground level since it is on a hill. Well, actually, my husband, my dad, and my son did this part :).

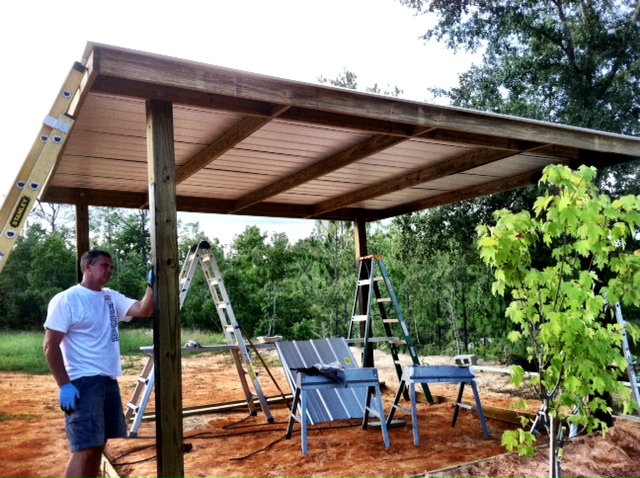
Once they added and flattened or packed down the clay and began with the frame. For the base, they used four 6x6x12 posts and four 2x6x16 boards. they formed a 14x14 square on the ground first with the 2x6 boards. Inside each corner, they added a post by digging into the ground three foot on one end and three foot 6 inches on the other end. The front end posts are 6 inches taller than the back end posts are to allow for rain to drain to the rear of the pavilion. They added concrete to the holes and allowed that to set for 24-48 hours.

Here is where me and Kait come in to action to help Kerry. We began the frame of the building by bolting a 2x6x16 from front post to rear post on each side. Then we started in the middle forming an "H" from a sky view looking down. Once we measured...twice and cut once we attached a 2x6 to the middle. Now you can imagine it as an "H" then we measured out 4 foot from the middle towards the front and again from the middle towards the back and added boards there. We added a board to connect the posts on the end of each and they surpass the original sides of the "H" by about 12 inches. My son shows up to help again.... Now we connected a second 2x6 that parallels the original side of the "H" and cut short 9 inch headers that will line up with the three middle boards for support to make a little strength for the overhang.
My hubby is working hard!

I purchased some metal costing $160.00 and had our son attach it to the roof frame with wood screws. I found that galvalume silver is the cheapest with a 40 yr warranty and reflects the most light making it cooler underneath.
Now to make the posts match the house, I started staining all the posts. About an hour or two later, my husband came out to help and then my daughter followed shortly after. What a great family. Yep and good ol' dad comes to the rescue with a nice paint brush shortly after that. I chose to stain the frame a rich walnut color because that is what we used in the house on the beams in our living room and master bedroom ceilings.
Now Kerry has to go back and repack the clay this weekend to prepare for the concrete that will come on Monday evening after work... wish us luck!
Once the concrete has set, we will move the grill to the pavilion. Then paint the concrete; build a farmhouse table for dining; add sod and paper lanterns; and add a tree in memory of my Granny.

