Saturday, January 14, 2012

Toilet Paper Storage Box

My hubby wants extra rolls of toilet paper in the potty room. It drives me insane to have extra toilet paper sitting on the back of the toilet. I think it looks tacky.  I guess that is why some companies have placed toilet paper backup roll holders on the market. I just really don't like the designs that I have seen so far. Some look like they are covered in wallpaper from the 60's. Not my style at all!


I decided to give ol' dad a call and busy up his day! He was available too. I am so lucky.

The first thing that we did together is figure out how big it should be. I measured the tank and the toilet paper rolls. Then I decided to stretch it to fit a whopping three rolls. I would suggest one maybe two for anyone out there interested.

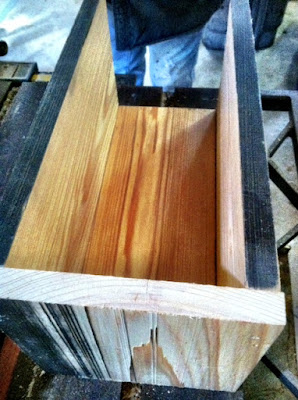
The next thing I did, was pull out some scrap wood from building my house. We three pieces the length. We ran them through the planer.


Gave them a quick sanding. Brushed off the loose particles. Then we glued the three pieces together.


Next we shot a few nails into them for a more permanent hold. My Dad has all kinds of neat tools. I just get to supervise mostly when we work together. He loves that! :)


Once that was completed, we cut two pieces the length and width of the end. Then we glued and nailed them on as well.


For the lid, I had some slats that we cut the length and trimmed the edges to fit with a small 1/4" lip over the top on three sides. I kept the backside flush so it doesn't hit the wall.


I glued them together. Once the glue dried, we added two small blocks under the lid to keep it from being knocked off easily. This was the trickiest part of all. You have to measure from the side of the lid to width of the board on the side of the box and add the lip. Then you repeat for the front. Do this on both sides and nail the blocks in place.


Once that part was complete. I sanded it again  with 180 sandpaper. I wiped it clean of all particulate matter. Then I added a coat of spray paint in rubbed bronze color.


After the paint dried, I used Gorilla Wood Glue to add a handle. For the handle, we just cut a piece of 1x2 and trimmed off the two corners at an angle. You can see it above in the bottom right corner. The shade makes it appear larger than it really is.

Once it was dried, I put it on the toilet tank and filled it with three rolls of toilet paper.


If I had to do it over, I would have made it just for one roll, or a tall tower that stands on the ground. I love it though, and I can't think of a better way to spend my day then with my Dad.  

Spruced Up Book Rack--Thrift Store Find

I got this ugly old book rack at the thrift store last year. I decided since I had made the canvas art and toilet paper storage box for my bathroom that I would spruce this up too. I added a coat of spray paint in rubbed bronze color.  


 Next I added a few half circle accordions and hot glued them to the front. That was it for this project. I really don't like reading material in the restroom--but I don't get to decide on everything in my king's castle.


Well, it really does look better than it did. Haha.

Bathroom Wall Art Made Easy


My walls in my bathrooms are pretty bare in my house, because I never know what to put on them. Every time I make a trip to visit my mom, we go to the art store. I know exactly where I get it from. I am right in the middle of painting her bathroom cabinets, when she approaches me to say... "I want to go to the art store when you get done". LOL. "Okay mom..." and off we go while waiting for the cabinets to dry before a second coat. She doesn't have to tell me twice!

During our frequent visits to the art store, I always find myself milling around the canvases. Shortly after, I of course have purchased whatever is on sale. It is usually a 2 for 1 deal that I am proud to bring home and stack up under my desk for a rainy day. I also have filing, computer work, etc. to do on rainy days, and it seems we have been in a drought for two+ years.  Needless to say my canvases are starting to get in my way. :o). I just never can settle on what I want on my own walls. I just don't know why but I draw a blank every time I try to create something for myself.

After being tired of lazing around today, I decided to get it together and make something for my bathroom walls. I decided why not start with the interior walls that no one visits, but me. That way, if it looks bad, I won't have to be embarrassed.

I got a new Cameo Silhouette for my birthday and I haven't really played with it much since. I know that is crazy! So today is the Cameo's lucky day.

I pulled out two small canvases that I got for a total of $3.99 on sale. They will be perfect since my bathroom is not very spacious.


I painted the canvas with a color of my choice, #456 True Burgundy from Folk Art. Folk Art paint sales for between $0.97-$2.00 at your local Wally World. I can't remember the exact amount.


Once the canvas was dry, I used my Cameo to cut vinyl "No. 1" and "No. 2". Yes you guessed right! It is going right over my little potty too. I peeled the stickers and added them.

If you don't have a Silhouette or a Cricut, then you have choices. You can either print, press & trace, then paint in the outline left on the canvas. You can cut and mod podge (1/2 glue and 1/2 water) the letters and numbers on if you don't have a vinyl cutter. Another option would be to email your word document to your local vinyl or sign store and they will cut it for you at a low cost.


I also added some hot glue to the backside of a few mod accordion circles made from a previous post. You can access that here.


I hung them on the wall and tadah!!


It is simple, quick, and inexpensive! That is the best part. :o)