Sunday, December 4, 2011

Uniform Sized Cookies-- Great For Gift Giving


To get sugar cookies to look uniform in size, I use a muffin pan. I love the look of cookies being similar in size and shape especially when gift giving.

I start with a recipe or cookie mix of my choice. For this tutorial, I won't show you how I made the cookie dough, but I will say that I used Krusteaz Sugar Cookie Mix from Sams. You can really make a lot of cookies for gift giving with this package and they are scrumptious!


When my dough is ready, I use my cookie scooper to make dough balls the size of 1 tablespoon. You can use your hands for this part though.


I roll it in baker's sugar or sugar crystals. They are larger in size than granulated sugar, which makes for a prettier site when baked. I also think that they taste better and add texture.


I use Pam to lightly coat my muffin pan even though it says un-greased cookie sheet. This way they come out with no issues because the middle of the bottom sometimes wants to stick. I fill up my muffin tin and bake as directed on the cookie mix. Very important: Don't overcook your cookies!


Forgive my pan, it is really old! Once the cookies come out of the oven, I let them sit a few minutes to allow for the bottom of the cookies to brown a little more. I use a small butter knife or an offset spatula to run along the inside of the muffin cup around the outside of the cookie. Then I gently lift the cookie from the muffin tin and place it onto a sheet of foil to further cool.


They come out thick, but I use my cookie press to flatten them a little while they are still warm. This ensures that the cookies stay chewy and soft :).


They are really looking tasty!! Once they cool, you can handle them as much as you like!! Hmm hmm good.


What Santa doesn't want to be covered in sugar cookies?


Country Girl Boot Leggings aka Faux Boot Socks


I keep seeing boot socks. I have bought a few pair, but I was trying to think of a way to make some country looking boot socks. I decided that instead of boot socks I would make leggings to wear over your jeans and under your boots. No one will ever know!

I picked up a pair of $5 long underwear bottoms at Wal-Mart.


I cut the legs off.


I actually had to keep part of the crotch because my daughter is 5'10" tall. I cut off the crotch part and sewed up the side to make a straight leg. If you are shorter, just cut off the area below so you can skip the step of sewing the leg straight.


I had my daughter try it on...see what I mean? Her legs never end!

I put a hem in the cut area to give it a clean line. I flip the hem over as I move along. See above...


Taking the bottom of the long underwear--where there is a tight cuff, and I turned it inside out. Then I stretched the cuff over a book with a piece of wax paper on the top. I pinned the lace to the cuffed area. The lacy cuff will actually be at the top of the legging instead of the bottom. The cuff stretches nicely and will hold the legging up.  I trimmed the end of the lace leaving about 1/2" on each end overlapping. I used Fabritac to make a small hem on each end of the lace for a finished look.

I stitched the lace to the legging's cuff with a sewing machine. I stopped before the ends met about 1/2" to use the Fabritac to adhere one edge over the other. It dries very quickly.  


Once dried, I used the sewing machine to finish sewing the lace to the legging.


Don't let this picture fool you... we have oversize bricks on our home. She really is 5'10" and still growing!


She kept one lace upward and one downward to show you what it would look like either way. It also appears that she has a boot that does not want to stay up. :/ ugh...

Happy Crafting!
-K


DIY Lacy Tank Top


This summer, my daughter wanted a lacy tank top for $49.50 from one of her most favorite companies. That was to me just an outrageous cost for a little lace and a tank. I told her no way not ever!  Then I decided that it was too easy we could definately do this together...

 
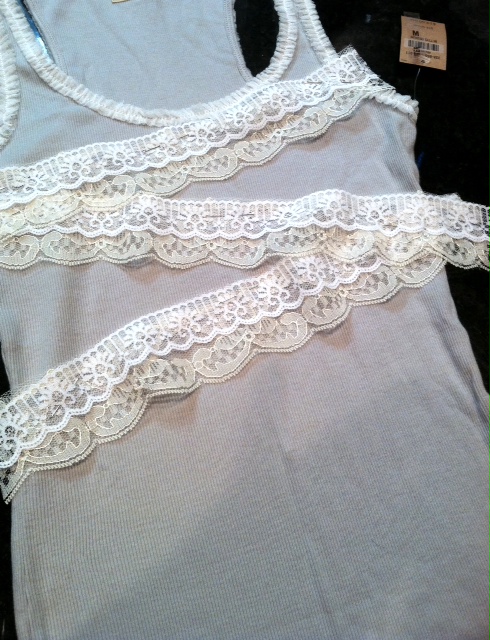
I found this tank on clearance and it already had a small trim around the neckline and the arms made of scrunched tulle. It was better than perfect. We got it on clearance for a little under $10.00. 
The initial shirts she wanted had two colors of lace on gray. The tank we created looked pretty close. The lace I purchased at the local Jo Ann Fabric store. All I need was one yard of each with some to spare and I got it for $5.60. The rest of the stuff I had on hand!


MATERIALS:
Lace Trim
Scissors
Sewing Machine
Wax Paper
FabriTac
Thread
Pins
Ribbed Tank
Measure Tape


To get my measurement for the lace, I used a measure tape on the model wearing the tank. I measured from the left seam to the right seam in a zig zag pattern. I added 1 1/2 inches to the lace for the hem and for extra allowance.

NOTE: Do not cut your lace on an unworn shirt, it needs to be stretched normally--it takes a little extra lace when it is stretched. 
On a sheet of wax paper, run a thin line of FabriTac glue across the top right side of the bottom wider lace. Add the smaller lace to the top and press gently. The FabriTac dries in about 5 minutes. Now your lace will be one long piece. Add the FabriTac to one end of one side of the lace and fold backwards about 1/4" to create a hem. 


Have your model put on the shirt and pin the lace in a zigzag.  Start with the side of the lace that has the hem on the end. Pin it to the seam of the shirt.


When you have it pinned, gently remove it from your model. Sew the lace onto the shirt removing the pins as you go. You may have to stretch the ribbed tank just a bit while sewing. Start with the hemmed edge of the lace and stop about 1 inch before the opposite end. Backtack your thread on your machine and trim the extra lace leaving enough for a hem. Flip 1/4" of the hem towards the back side. Add a little FabriTac to seal the hem and press it closed with your fingers. Sew the remaining portion down.


You now have a beautiful inexpensive lacy tank that everyone will think you surely paid full price for!!